Replicated Onboarding (Helm CLI Only)
This topic provides Replicated onboarding steps for vendors that support Helm CLI installations only for their application.
For information about how to onboard your application to the Replicated Platform to support installations with both Replicated installers and the Helm CLI, see Replicated Onboarding (Replicated Installers and Helm CLI).
Before You Begin
Best Practices and Recommendations
The following are some best practices and recommendations for successfully onboarding with Replicated:
-
When integrating new Replicated features with an application, make changes in small iterations and test frequently by installing or upgrading the application in a development environment. This will help you to more easily identify issues and troubleshoot. This onboarding workflow will guide you through the process of integrating features in small iterations.
-
Use the Replicated CLI to create and manage your application and releases. Getting familiar with the Replicated CLI will also help later on when integrating Replicated workflows into your CI/CD pipelines.
-
These onboarding tasks show you how to create releases in the Replicated Platform and then test the installation of each release in a cluster using the Helm CLI. For information about how to add support
Getting Help from the Community
The Replicated community site is a forum where Replicated team members and users can post questions and answers related to working with the Replicated Platform. It is designed to help Replicated users troubleshoot and learn more about common tasks involved with distributing, installing, observing, and supporting their application.
Before posting in the community site, use the search to find existing knowledge base articles related to your question. If you are not able to find an existing article that addresses your question, create a new topic or add a reply to an existing topic so that a member of the Replicated community or team can respond.
To search and participate in the Replicated community, see https://community.replicated.com/.
Prerequisites
-
Create an account in the Vendor Portal. You can either create a new team or join an existing team. For more information, see Create a Vendor Account.
-
Set up your local workstation with the required toolkit for working with the Replicated Platform. See Set Up Your Local Workstation.
-
Make sure you have access to a Kubernetes cluster for testing your releases. For information about how to create a cluster, see Create a Kubernetes Cluster in Set Up Your Environment.
-
Complete a basic tutorial to create an application with a sample Helm chart and then promote and install releases in a development environment. This helps you get familiar with the process of creating, installing, and updating releases in the Replicated Platform. See Install SlackerNews with the Helm CLI.
Onboard
Complete the tasks in this section to onboard your application to the Replicated Platform.
Task : Create an app in the Vendor portal
To get started with onboarding, first create a new application. This will be the official Vendor Portal application used by your team to create and promote both internal and customer-facing releases.
To create an application:
-
Create a new application using the Replicated CLI or the Vendor Portal. Use an official name for your application. See Create an Application.
Can I change the application name in the future?
You can change the application name, but you cannot change the application slug.
The Vendor Portal automatically generates and assigns a unique slug for each application based on the application's name. For example, the slug for "Example App" would be
example-app.Application slugs are unique across all of Replicated. This means that, if necessary, the Vendor Portal will append a random word to the end of slug to ensure uniqueness. For example,
example-app-flowers. -
Set the
REPLICATED_APPenvironment variable to the unique slug of the application that you created. This will allow you to interact with the application from the Replicated CLI throughout onboarding. See Set Environment Variables in Installing the Replicated CLI.For example:
export REPLICATED_APP=my-app
Task : Add the Replicated SDK to your chart
Next, add the Replicated SDK as a dependency of your Helm chart.
The Replicated SDK is a Helm chart that can be installed as a small service alongside your application. The SDK provides access to key Replicated functionality, including an in-cluster API and automatic access to insights and operational telemetry for instances running in customer environments. For more information, see About the Replicated SDK.
To add the Replicated SDK:
-
In your application Helm chart
Chart.yamlfile, add the YAML below to declare the SDK as a dependency.If your application is installed as multiple charts, declare the SDK as a dependency of the chart that customers install first. Do not declare the SDK in more than one chart. For more information, see Package a Helm Chart for a Release.
# Chart.yaml
dependencies:
- name: replicated
  repository: oci://registry.replicated.com/library
  version: 1.12.1
For the latest version information for the Replicated SDK, see the replicated-sdk repository in GitHub.
Task : Configure your chart to use the Replicated proxy registry
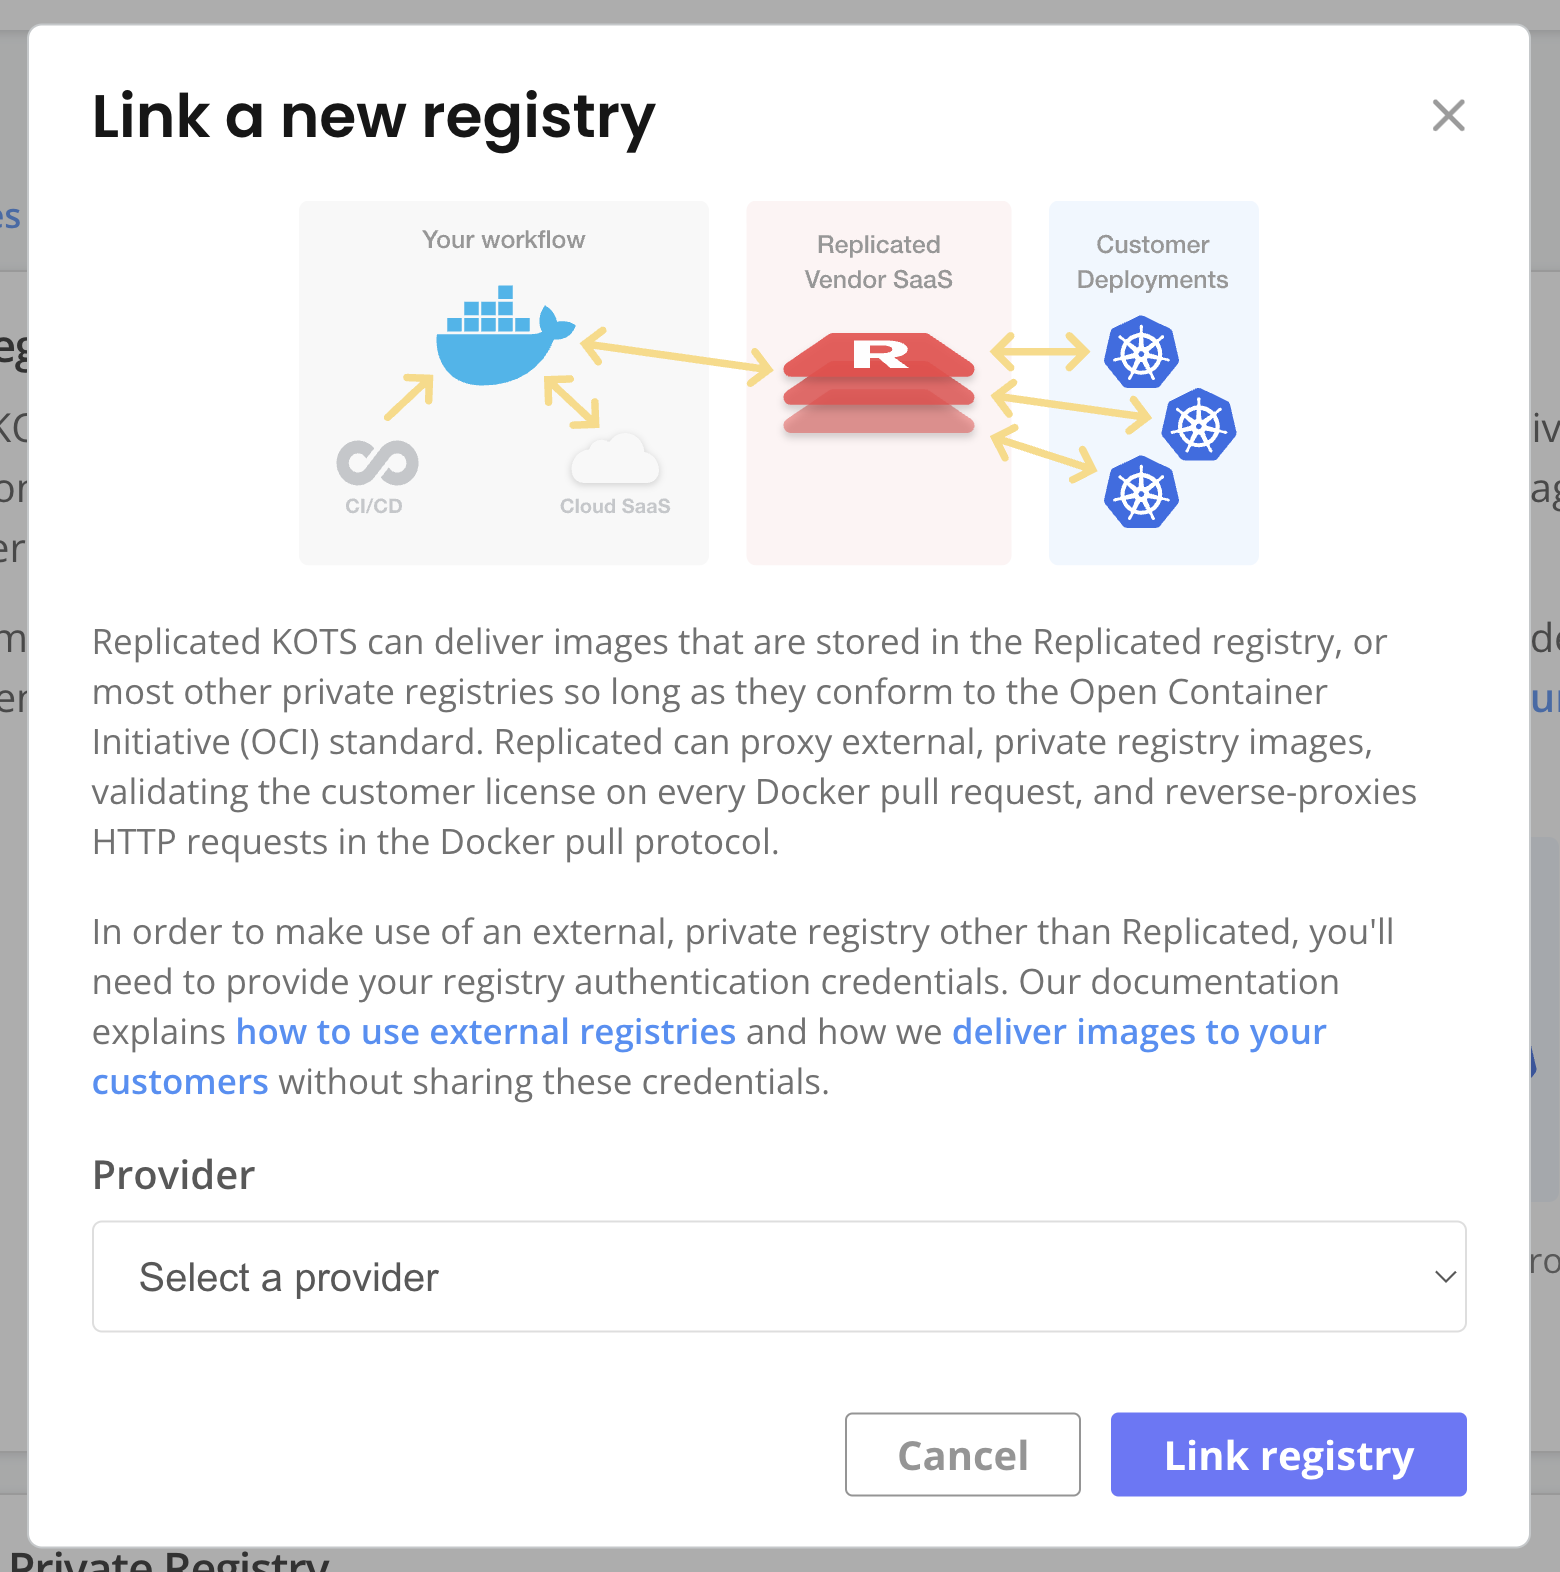
The Replicated proxy regsitry allows you to grant proxy access to your application images without exposing registry credentials to your customers.
To use the proxy registry in Helm CLI installations, update your Helm values so that image references point to the Replicated proxy registry rather than to your default registry. Then, add a Secret to your chart to authenticate with the proxy registry.
To configure your chart to use the proxy registry:
-
In the Vendor Portal, go to Images > Add external registry and provide read-only credentials for your registry. This allows Replicated to access the images through the proxy registry. See Add Credentials for an External Registry in Connecting to an External Registry.
-
For each image reference in your Helm chart values file, set the image repository URL to the location of the image in the proxy registry. The domain for this URL is either
proxy.replicated.comor your custom domain.The proxy registry URL has the following format:
DOMAIN/proxy/APP_SLUG/EXTERNAL_REGISTRY_IMAGE_URLWhere:
DOMAINis eitherproxy.replicated.comor your custom domain.APP_SLUGis the unique slug of your application.EXTERNAL_REGISTRY_IMAGE_URLis the path to the private image on your external registry.
Example:
# values.yaml
api:
  image:
    # proxy.replicated.com or your custom domain
    registry: proxy.replicated.com
    repository: proxy/your-app/ghcr.io/cloudnative-pg/cloudnative-pg
    tag: catalog-1.24.0
Ensure that any references to the image in your Helm chart access the field from your values file.
Example:
apiVersion: v1
kind: Pod
spec:
  containers:
    - name: api
        # Access the registry, repository, and tag fields from the values file
image: {{ .Values.image.api.registry }}/{{ .Values.image.api.repository }}:{{ .Values.image.api.tag }} -
If your application is deployed as multiple Helm charts, repeat the previous step to modify image references in the Helm values for each of your charts.
-
Follow the steps in Use the Proxy Registry with Helm CLI Installations to authenticate with the Replicated proxy registry by creating a Secret with
type: kubernetes.io/dockerconfigjsonin your Helm chart. -
Update dependencies and package the chart as a
.tgzfile:helm package -u PATH_TO_CHARTWhere:
-uor--dependency-updateis an option for thehelm packagecommand that updates chart dependencies before packaging. For more information, see Helm Package in the Helm documentation.PATH_TO_CHARTis the path to the Helm chart in your local directory. For example,helm package -u ..
The Helm chart, including any dependencies, is packaged and copied to your current directory in a
.tgzfile. The file uses the naming convention:CHART_NAME-VERSION.tgz. For example,postgresql-8.1.2.tgz.noteIf you see a
401 Unauthorizederror message, log out of the Replicated registry by runninghelm registry logout registry.replicated.comand then runhelm package . --dependency-updateagain. -
If your application is deployed as multiple Helm charts, package each chart as a separate
.tgzarchive using thehelm package -u PATH_TO_CHARTcommand.
Task : Add the HelmChart custom resource and create a release
For each HelmChart in your release, add the Replicated HelmChart custom resource. This resource allows Replicated to generate a list of images used by your Helm chart, which provides access to features such as air gap installation and reporting on images through the Security Center (Alpha). For more information, see HelmChart v2.
To add the HelmChart custom resource:
-
In the local directory for your Helm chart, create a subdirectory named
manifestswhere you will add the files for your first release. -
Move the
.tgzchart archive(s) that you packaged to themanifestsdirectory. If your application is deployed as multiple Helm charts, move each.tgzarchive tomanifests. -
In the
manifestsdirectory, create a new YAML file namedYOUR_CHART_NAME.yaml. For example,samplechart.yaml. In the file, add the following to create the KOTS HelmChart v2 custom resource for your primary Helm chart, updating the fields as needed to match the name and version of the chart:# HelmChart custom resource
apiVersion: kots.io/v1beta2
kind: HelmChart
metadata:
name: samplechart
spec:
chart:
# name must match the chart name from the .tgz chart archive
name: samplechart
# chartVersion must match the chart version from the .tgz chart archive
chartVersion: 1.2.3 -
If your application is deployed as multiple Helm charts, add and configure a separate HelmChart custom resource for each Helm chart archive in the release.
-
From the
manifestsdirectory, create a release and promote it to the Unstable channel. For more information, Managing Releases with the CLI.replicated release create --yaml-dir . --promote Unstable -
Install the release in your development environment to test. See Install with Helm.
Task : Define Prelight Checks
In the next two tasks, you will add specs for preflight checks and support bundles.
Preflight checks and support bundles are provided by the Troubleshoot open source project, which is maintained by Replicated. Troubleshoot is a kubectl plugin that provides diagnostic tools for Kubernetes applications. For more information, see the open source Troubleshoot documentation.
Preflight checks and support bundles analyze data from customer environments to provide insights that help users to avoid or troubleshoot common issues with an application:
- Preflight checks run before an application is installed to check that the customer environment meets the application requirements.
- Support bundles collect troubleshooting data from customer environments to help users diagnose problems with application deployments.
To define preflight checks for your application:
-
In your Helm chart
templatesdirectory, add a Kubernetes Secret that includes a preflight spec. For more information, see Define Preflight Checks. For examples, see Example Preflight Specs.noteIf your application is deployed as multiple Helm charts, add the Secret to the
templatesdirectory for the chart that is installed first. -
Update dependencies and package the chart as a
.tgzfile:helm package -u PATH_TO_CHARTWhere:
-uor--dependency-updateis an option for thehelm packagecommand that updates chart dependencies before packaging. For more information, see Helm Package in the Helm documentation.PATH_TO_CHARTis the path to the Helm chart in your local directory. For example,helm package -u ..
The Helm chart, including any dependencies, is packaged and copied to your current directory in a
.tgzfile. The file uses the naming convention:CHART_NAME-VERSION.tgz. For example,postgresql-8.1.2.tgz. -
Move the
.tgzfile to themanifestsdirectory. -
Create a new release and promote it to the Unstable channel. For more information, see Manage Releases with the Vendor Portal or Managing Releases with the CLI.
-
Install the release in your development environment to test. See Install with Helm.
For Helm CLI installations, users can optionally run preflight checks before installing by installing the preflight plugin.
-
Continue to create and test new releases with additional preflight checks until you are ready to move on to the next task.
Task : Add support bundle spec
To add the default support bundle spec to your application:
-
In your Helm chart
templatesdirectory, add the following YAML to a Kubernetes Secret to enable the default support bundle spec for your application:apiVersion: v1
kind: Secret
metadata:
labels:
troubleshoot.sh/kind: support-bundle
name: example
stringData:
support-bundle-spec: |
apiVersion: troubleshoot.sh/v1beta2
kind: SupportBundle
metadata:
name: support-bundle
spec:
collectors: []
analyzers: []noteIf your application is installed as multiple Helm charts, you can optionally create separate support bundle specs in each chart. The specs are automatically merged when a support bundle is generated. Alternatively, continue with a single support bundle spec and then optionally revisit how you organize your support bundle specs after you finish onboarding.
-
(Recommended) At a minimum, Replicated recommends that all support bundle specs include the
logscollector. This collects logs from running Pods in the cluster.Example:
apiVersion: v1
kind: Secret
metadata:
  name: example
  labels:
    troubleshoot.sh/kind: support-bundle
stringData:
  support-bundle-spec: |-
    apiVersion: troubleshoot.sh/v1beta2
    kind: SupportBundle
    metadata:
      name: example
    spec:
      collectors:
        - logs:
            selector:
              - app.kubernetes.io/name=myapp
            namespace: {{ .Release.Namespace }}
            limits:
              maxAge: 720h
              maxLines: 10000
For more information, see:
- Adding and Customizing Support Bundles
- Example Support Bundle Specs
- Pod Logs in the Troubleshoot documentation.
-
(Recommended) Ensure that any preflight checks that you added are also include in your support bundle spec. This ensures that support bundles collect at least the same information collected when running preflight checks.
-
Update dependencies and package the chart as a
.tgzfile:helm package -u PATH_TO_CHARTWhere:
-uor--dependency-updateis an option for thehelm packagecommand that updates chart dependencies before packaging. For more information, see Helm Package in the Helm documentation.PATH_TO_CHARTis the path to the Helm chart in your local directory. For example,helm package -u ..
The Helm chart, including any dependencies, is packaged and copied to your current directory in a
.tgzfile. The file uses the naming convention:CHART_NAME-VERSION.tgz. For example,postgresql-8.1.2.tgz. -
Move the
.tgzfile to themanifestsdirectory. -
Create a new release and promote it to the Unstable channel. For more information, see Manage Releases with the Vendor Portal or Managing Releases with the CLI.
-
Install the release in your development environment to test. See Install with Helm.
For information about how to generate support bundles, see Generate Support Bundles.
-
(Optional) Customize the support bundle spec by adding additional collectors and analyzers.
Task : Alias replicated endpoints
Your customers are exposed to several Replicated domains by default. Replicated recommends you use custom domains to unify the customer's experience with your brand and simplify security reviews.
After adding a custom domain for the Replicated proxy registry, be sure to update any image references in your Helm chart values to point to your custom domain rather than the proxy registry at proxy.replicated.com.
For more information, see Use Custom Domains.
Task : Set up the Enterprise Portal
The Replicated Enterprise Portal is a customizable, web-based portal where your customers can find installation instructions, check for application updates, manage their team members, get application support, and more.
To set up the Enterprise Portal:
-
Customize Enteprise Portal settings such as your support portal link, contact email, and the primary and secondary colors for the UI. See Manage Enterprise Portal Settings in Customize the Enterprise Portal.
-
Customize the customer emails sent by the Enterprise Portal. See Customize Emails.
-
Customize the user instructions available in the Enterprise Portal, including the installation and update instructions. See Customize User Instructions.
-
Test your customizations by enabling the Enterprise Portal for a test customer. Verify that the installation and update instructions available in the Enteprise Portal are accurate and complete.
-
When you are ready, enable the Enterprise Portal by default for all customers: go to Enterprise Portal > Customer Access and enable to Portal access toggle.
(Optional) Task : Add support for air gap installations with the Helm CLI
Replicated supports installations in air gap environments with little or no outbound internet access. For Helm CLI installations, users install by following automatically-generated instructions provided in the Enterprise Portal to pull all images and push them to their local image registry.
To add support for air gap installations:
-
For each Helm chart in your release, configure the corresponding HelmChart custom resource
builderkey. In thebuilderkey, define any Helm values that must be set so that the output ofhelm templateexposes all container images needed to install the chart in an air-gapped environment. This ensures that the Vendor Portal can build the air gap bundle for the release. See Package Air Gap Bundles for Helm Charts and builder.How do I know if I need to configure the
builderkey?When building an air gap bundle, the Vendor Portal templates the Helm charts in a release with
helm templatein order to detect the images that need to be included in the bundle. Images yielded byhelm templateare included in the bundle for the release.For many applications, running
helm templatewith the default values would not yield all the images required to install. In these cases, vendors can pass the additional values in thebuilderkey to ensure that the air gap bundle includes all the necessary images. If the default values in your Helm chart already expose all the images for air gap installations, then you do not need to configure thebuilderkey. -
Create and promote a new release with your changes. For more information, see Managing Releases with the CLI.
-
In the Vendor Portal, go the channel where the release was promoted to build the air gap bundle. Do one of the following:
- If the Automatically create airgap builds for newly promoted releases in this channel setting is enabled on the channel, watch for the build status to complete.
- If automatic air gap builds are not enabled, go to the Release history page for the channel and build the air gap bundle manually.
-
Create or edit a customer with the Helm CLI air gap entitlement enabled so that you can test air gap installations. See Create and Manage Customers.
-
Follow the steps in Install and Update with Helm in Air Gap Environments to access the Enterprise Portal for the customer and test air gap installation in a cluster with Helm.